Nexelit Multipurpose Website & Agency Business CMS is the perfect agency business or any kind of website with this PHP Script. Nexelit is a better way to present your business, corporate website, construction website, interior, agency, events, event ticket selling, donation website, crowdfunding, fund rising, job posting, manage your customer, quotation, clients feedback, product selling, digital product selling, physical product selling, downloable product selling, various kind of website etc. It’s easy to customise and also well documented.
If you change anything in the script files, you will lose all change after update the script.
xgenious team
Step: 01
Login to your website control panel ( cpanel or ftp ) go to the directory where nexelit cms is installed. now go to “@core” folder and open “.env” file. copy below content and save those details anywhere in your computer, we need those info in step: 07.
DB_CONNECTION=mysql
DB_HOST=localhost
DB_PORT=3306
DB_DATABASE=
DB_USERNAME=
DB_PASSWORD=
MAIL_DRIVER=smtp
MAIL_HOST=
MAIL_PORT=
MAIL_USERNAME=
MAIL_PASSWORD=
MAIL_ENCRYPTION=Step: 02
if add use custom css from your admin panel, then follow this step otherwise you can skip this step and go to step: 03
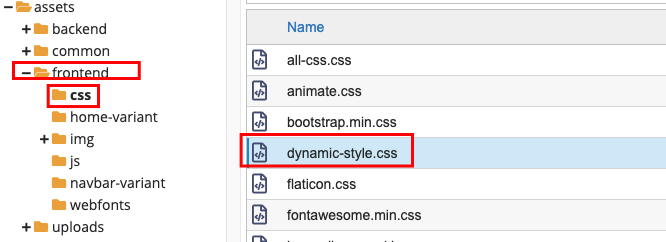
go to “assets>frontend>css“ folder and open “dynamic-style.css” file. download this file and save it anywhere in your computer, we need this file in step:08

Step: 03
now you need to backup all of your uploaded images/files. go to “assets>uploads” folder zip all and download it to your computer. we need this file in step:09.

Step: 04
Follow this step if you add any new language or translated any languages data, we will keep backup of your translated data in this step. go to “@core>resources>lang” folder now select all file and make it zip file and download it to you computer. we need all those file in step: 10

Step: 05
login to your codecanyon account and download the script latest file. now unzip it and open “installable_file” you will find a zip file “nexelit_v2.2.zip”. you need to upload this file in your server.
Step: 06
before start this step, make sure you follow all above step, also kept a backup of complete script and database.
xgenious team
after upload the script file, now you have to delete all script file from server. now unzip uploaded “nexelit_v2.2.zip” file in server.
Step: 07
now we have to connect the script with our old database, to do this we need .env file data which i save in our computer in “Step: 01”, goto “@core” folder open “.env” file replace below content with your saved data. if you did not find any “.env” file then create a “.env” file and copy all content from “env-sample.txt” file.
DB_CONNECTION=mysql
DB_HOST=localhost
DB_PORT=3306
DB_DATABASE=
DB_USERNAME=
DB_PASSWORD=
MAIL_DRIVER=smtp
MAIL_HOST=
MAIL_PORT=
MAIL_USERNAME=
MAIL_PASSWORD=
MAIL_ENCRYPTION=Step: 08
in this step we will restore our written custom css. go to “assets>frontend>css“ folder and open “dynamic-style.css” file. now copy all the content from your download “dynamic-style.css” file, which we get in “Step: 02”. now paste it this file and shave changes

Step: 09
we will restore all of our upload image/file in this step. go to “assets>uploads” folder . now delete everything form this folder. upload the backup file which you did in step:03 and unzip it here.
Step: 10
Follow this step if you followed step:04 .we will restore all of our downloaded translated files. go to “@core>resources>lang” folder delete all file from this folder, now upload the backup file which we kept in step: 04 and unzip the file now delete the zip file, our translated string backup restore done.
Step: 11
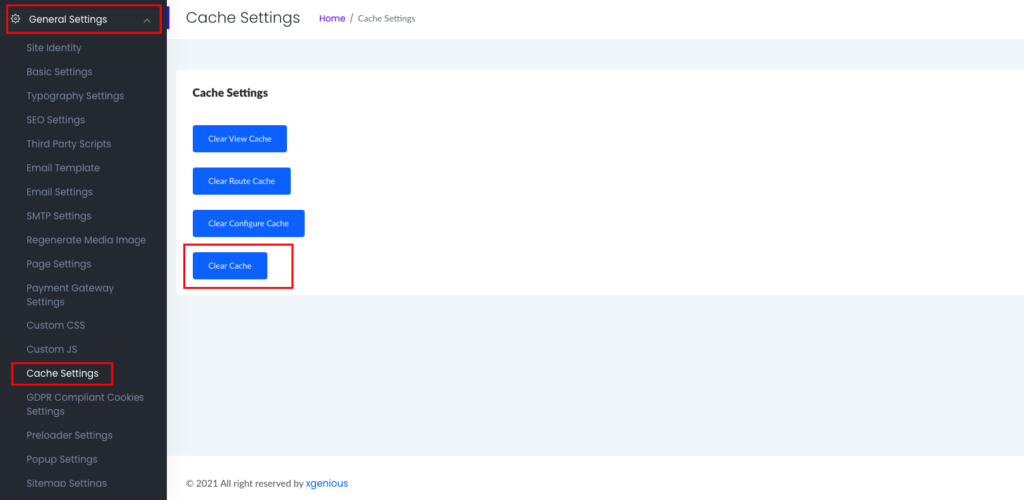
our all backup upload is done, now we have to clear our cache to see the latest changes. login to your admin dashboard and go to “General settings> Cache Settings” click on “clear cache”. now enjoy latest version of nexlit.

that’s all now you script is updated to latest version of nexelit, if you need any kind of help please contact our support.
xgenious team
